Multiple shared password stores with Git and pass

In this post, we will use pass to set up a complete, shared and segmented, professional password store.
This post contains ideas and suggestions for a more advanced use of pass; it's intended for people who already know its basic usage.
Before all, why do I use a trivial command line tool instead of one of the many fancy password managers available?
Because I believe critical things need to be kept simple.
They need to be open source and have proven themselves by being maintained, audited, and used by many.
Even a serious security company is capable of inadvertently exposing a backdoor on their users' machines allowing remote code execution and the theft of your passwords (← I really recommend the reading of this story).
pass is one bash script relying on GPG. Both tools are open and have been used extensively for a while.
There are some GUIs for pass, some browser extensions, mobile apps, etc. but choose them carefully: the more we add, the larger the attack surface becomes.
I use Termux on Android, which provides pass in its packages. It doesn't autofill credentials, but apps and websites are good at remembering who you are these days, so I don't need to log in often.
Retrieve a password
First, a little tweak for the retrieval of a password.
The default command — pass -c <password-name> — outputs the password in the clipboard and clears it after 45 seconds.
However, I have a clipboard manager that keeps everything I put in the clipboard.
To prevent passwords from being recorded, I wrote a command that outputs them in the X selection instead of the clipboard. To paste them, I click the middle mouse button, instead of using Ctrl-V.
To do that, add the following in your .zshrc (you might have to make some modifications if you're using a different shell):
p() {
	# Insert the password into the X selection
	# (also called primary, see `man xclip`)
	pass $1 | head -n 1 | tr -d "\n" | xclip

	# Countdown
	for i in {5..1}; do
		printf "\r$i"
		sleep 1
	done

	# Clear the selection
	echo -n "" | xclip

	echo "\r✔"
}

# Associate the completer of `pass` to the command `p`, allowing
# the Tab key to be used with `p` to autocomplete the passwords names
compdef _pass p

# Note: use `p` only to retrieve an existing password,
# not with other `pass` commands (`generate`, etc.)
Here it is in action:
Set up more than one password store
It's possible to have two completely separated password stores by creating a new command for the second one. The new command, passpro for instance, will use a different directory:
passpro() {
	# Set a different password store directory,
	# then run `pass` with all the arguments received by `passpro`
	PASSWORD_STORE_DIR=~/.password-store-pro pass $@
}

_passpro() {
	# Same idea for the completer
	PASSWORD_STORE_DIR=~/.password-store-pro _pass
}

# Then we associate the two
compdef _passpro passpro

# And we can have the same short command to retrieve a password:
pp() {
	PASSWORD_STORE_DIR=~/.password-store-pro p $@
}

compdef _passpro pp
Having two different pass commands is my preference, but there are other ways to have multiple stores. For instance, you could make use of .gitignore or git submodules to have the second store inside the first one.
Share a password store
We can share a password store with many people, while still being able to fine tune who has access to what.
- We create a subfolder for each team, for instance a
devssubfolder and asupportsubfolder:
~/.password-store-pro
├── devs
│   ├── databasePassword
│   ├── serverSshKey
│   └── stackCredentials
└── support
    ├── supportPlatformPassword
    └── supportEmailPassword
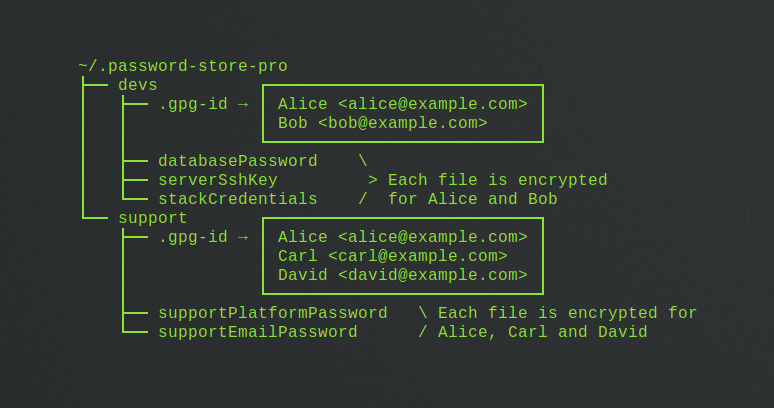
- Inside each, we put a
.gpg-idfile listing the PGP key UIDs of the persons having access to the content of this subfolder:
~/.password-store-pro
├── devs          ┌───────────────────────────┐
│   ├── .gpg-id → │ Alice <alice@example.com> │
│   │             │ Bob <bob@example.com>     │
│   │             └───────────────────────────┘
│   ├── databasePassword    \
│   ├── serverSshKey         > Each file is encrypted
│   └── stackCredentials    /  for Alice and Bob
└── support       ┌───────────────────────────┐
    ├── .gpg-id → │ Alice <alice@example.com> │
    │             │ Carl <carl@example.com>   │
    │             │ David <david@example.com> │
    │             └───────────────────────────┘
    ├── supportPlatformPassword   \ Each file is encrypted for
    └── supportEmailPassword      / Alice, Carl and David
And that's basically it.
There are a few other things to help us:
-
In the root directory, a
.public-keysfolder contains the public PGP keys of all the persons having access to the store. That allows the creation of new passwords that will be decryptable by the persons/teams we want. -
The
.gpg-idfile in the root directory lists who has access to the secrets in this directory — and any subfolder which doesn't have its own.gpg-id. We don't use it in this example. -
Finally, the bash script
encrypt.shis used to display detailed information about the password store, and to reencrypt it when a new user is given access to the store. Indeed, when a new user is added, every passwords he will have access to needs to be reencrypted for his public key. This process is explain later in this article.
So here's our complete, shared and segmented, professional password store:
~/.password-store-pro
├── .public-keys
│   ├── alice.asc
│   ├── bob.asc
│   ├── carl.asc
│   └── david.asc
├── devs          ┌───────────────────────────┐
│   ├── .gpg-id → │ Alice <alice@example.com> │
│   │             │ Bob <bob@example.com>     │
│   │             └───────────────────────────┘
│   ├── databasePassword
│   ├── serverSshKey
│   └── stackCredentials
├── support       ┌───────────────────────────┐
│   ├── .gpg-id → │ Alice <alice@example.com> │
│   │             │ Carl <carl@example.com>   │
│   │             │ David <david@example.com> │
│   │             └───────────────────────────┘
│   ├── supportPlatformPassword
│   └── supportEmailPassword
├── .gpg-id
└── encrypt.sh
The content of encrypt.sh can be found here.
Now, let's see how to use the password store.
Add a new password to the shared store
Now that we have the structure of our shared store, let's create a password.
- First, we import the all public keys to our keyring:
gpg --import ~/.password-store-pro/.public-keys/*.asc
- And we trust them — the following needs to be done for each keys:
gpg --edit-key "<key-uid>"
gpg> trust
Your decision? 5
gpg> quit
- Optionally, we create a new Git branch. As the password store is a Git repository, we can run Git commands on this repository with
pass git, for instance:
passpro git checkout -b new-password
- Choose in which subfolder to put the new password, and generate it:
passpro generate -n devs/cloudPlatformCredentials 20
- Push the branch and create a pull request.
Give access to the password store to a new user
As stated before, when a new user is added, every passwords he will have access to needs to be reencrypted for his public key.
-
First, we add the user's public key to the
.public-keysdirectory. -
Then, we import it to our keyring:
gpg --import .public-keys/*.asc
- We find its uid:
gpg --list-keys
For instance, the uid can be: Elie <elie@example.com>
- We trust the public key:
gpg --edit-key "Elie <elie@example.com>"
gpg> trust
Your decision? 5
gpg> quit
- We add the key's uid in the
.gpg-idfile of each subfolder the new user needs to have access to; for instance, let's say that the new user is a developer, we add the key's uid indevs/.gpg-id:
Alice <alice@example.com>
Bob <bob@example.com>
Elie <elie@example.com>
- We now reencrypt all passwords and secrets for the new user:
./encrypt.sh devs
This will list the persons for whom the devs subfolder will be encrypted, and ask you to confirm:
Password store root directory:
	'/home/user/.password-store-pro'

1 subfolders will be encrypted.

'devs' will be encrypted for:
	Alice <alice@example.com>
	Bob <bob@example.com>
	Elie <elie@example.com>

Proceed? [y/N]
./encrypt.sh can also be run without any arguments, to reencrypt the whole store. However, remember that you need access to a password in order to be able to encrypt it for a new user, as you need to decrypt it first.
Decrypting passwords stays as easy than it is with a personal password store. Note that Windows users who only need read access to the passwords can install Gpg4win - instead of a non-official version of Pass.
I hope you enjoyed this article, have fun with Pass!